
Two techniques to make PowerPoint interactive with a map, diagram, timeline or chart.
At Buffalo 7, we’re always looking for clever ways to make our presentations feel like anything other than PowerPoint. Being able to interact with elements on your slides is more than a cheap trick used to make your audience think you’re some kind of PowerPoint wizard.
Tailoring your presentation to your audience shows you understand their needs and their challenges, but you don’t have time to rewrite your entire presentation before every meeting. By housing all possible avenues in one presentation, but making these elements interactive in PowerPoint with a simple click, you will make every audience feel like they’re your only one.
Below, one of our awesome developers, Matt, takes you through two ways you can make an interactive map in PowerPoint, based on your skill level. The example below shows how to add information pop-up boxes to an interactive map. However, these instructions could be applied to a diagram, timeline, or a complicated chart. This method allows you to break these heavy elements down into manageable chunks. Once you have the theory down, the opportunities are limitless.
Building your slide
Regardless of your skill level, the first step is the same: you need to build your slide.
There are plenty of map designs available to you online, but we use Shutterstock to source many of ours. Depending on your slide background design, it’s probably best to source a map with a transparent background.
Now, place all your location markers in the relevant places across your map. It’s important to get this slide completely accurate before you move on. If you find a mistake later, or you just need to change something seemingly simple, such as the colour of a marker, you will need to do it across every duplicate slide, so do your checks now.

Once you’re happy with your base slide design, it’s time to duplicate the slide. You will need one additional slide for each location pin. In the left-hand slide view, right click on the base slide and select Duplicate Slide. Continue to duplicate this slide until you have enough for all your locations, then select all the duplicate slides, right click again and select Hide Slide. By hiding these slides, you will only be able to access them when you click on the relevant location pin. This will stop you accidentally clicking through every location when you’re presenting.
Interactive PowerPoint map level one: simple animation
With all duplicated slides still selected, go to your Transition pane and select Fade. This will create the appearance of a fade animation on the pop-up box, when you click to reveal it.
Now, select the original base slide and add any entrance transitions you may want when first clicking into this slide. If you’re applying fade transitions throughout your presentation, that’s fine, you can stick with that here too.
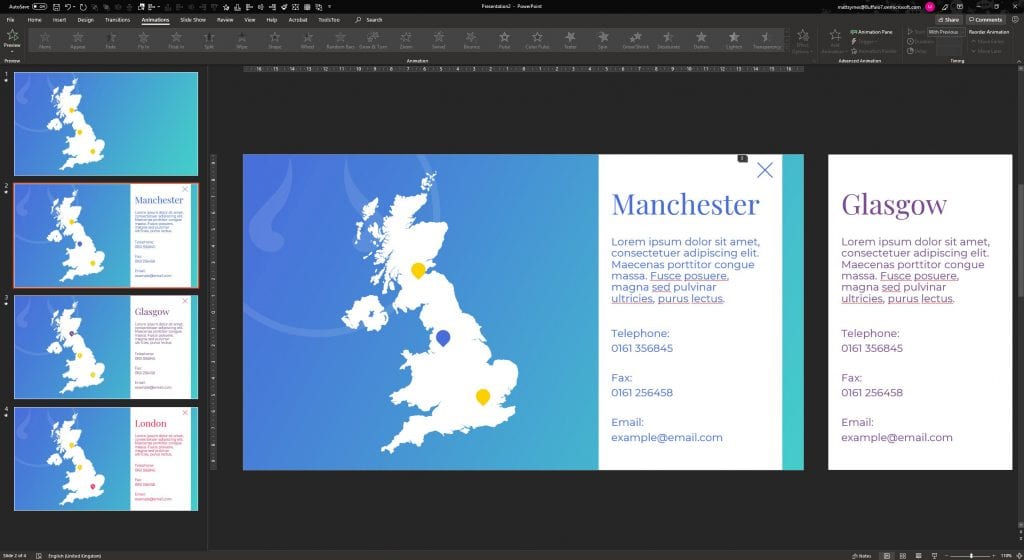
Now to add your location information. Click into your first hidden duplicate slide. Add a simple shape that you want to house your location information in. This is our example design, but you’ll want yours to be consistent with your brand and your slide:

Notice the cross in the top corner of the box? It’s important for you to have a way to navigate back to your base slide included in your design. We’ve chosen this web-style cross, but you could have a back arrow, home button, or just a blank area that the presenter knows to click to get back. We’ll cover how to add the navigation a little later.
Now, type in all your information for the first location. This could be contact details, relevant stats, anything you like. Once you’re happy with the look of this slide, carry out this step for the remaining hidden duplicate slides, filling each with one location box. You may also want to change the colour of the specific location marker on each of these slides, to remind the audience which location you’re talking about.

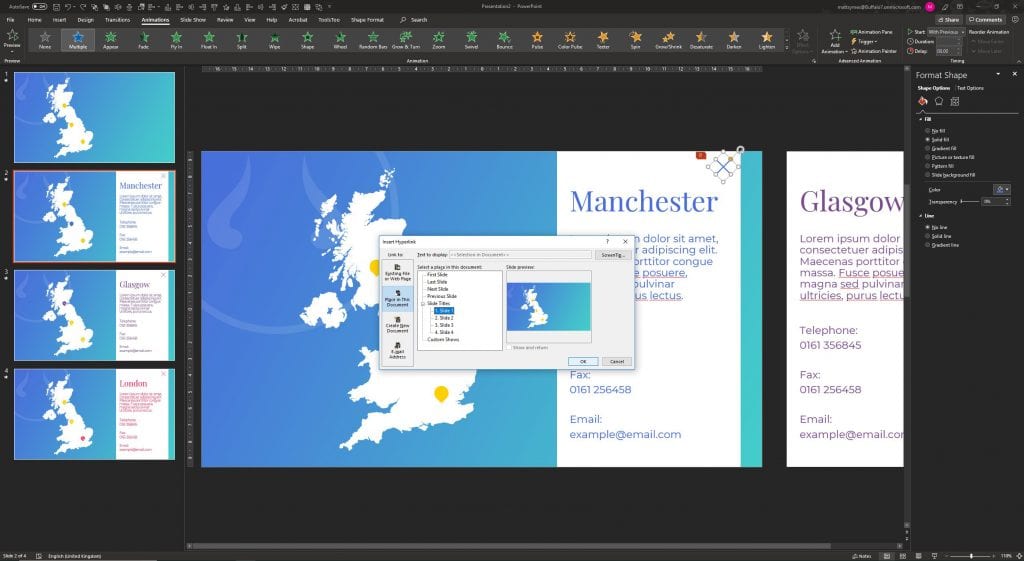
Time to hyperlink. This is such a simple trick and, once you’ve mastered it, this technique opens up a wealth of PowerPoint interactivity possibilities.
Click back to the base slide. Select your first location marker and right click. If you’re on a PC, select Link and under Link to:, choose Place in This Document. Then simply click the slide number of the relevant duplicated slide. If you’re on a Mac, once you’ve right clicked, you just need to click Hyperlink…, select This Document, and follow the same steps from here. Now, repeat this step for every location marker on the original base slide.
From your base slide, click into Slide Show mode to see your hard work in action. Click on any of your location markers and magically your location information box will fade on beautifully, without your audience knowing you’ve actually moved to a different slide.
But, wait. Now you’re stuck on this slide. Remember I mentioned our backwards navigation? Our final step for this method is to add our links back to the base slide. Add a hyperlink, in the same way as above, linking this cross on every duplicated slide back to the base slide.
Now you’re all done!
Level two: feeling confident?
We have shouted about the joys of Morph before, but we just can’t seem to shut up about this versatile PowerPoint transition. Unfortunately, if you’re on a version of the software that’s pre-2016, you may need to point your boss in the direction of our blog to convince them to let you upgrade. If you already have PowerPoint 2016 or later, and you want to create incredibly smooth transitions between your interactive map slides, keep reading.
Build and duplicate your slides the same as before, but when you select all duplicated slides and navigate to your Transition pane, you now want to click Morph instead.
Adding your location boxes is where it gets a little fiddly. For Morph to work effectively, you need to add all your location boxes and relevant information to all of the duplicated slides. However, only the box relevant to that slide sits on the slide itself, all the others need to be positioned slightly off the slide. In the example below, we’re on the slide about Manchester, so the other location boxes are stacked one on top of the other (in no particular order) to the right side.
The best way to not confuse Morph is to be meticulous with your elements. Always copy and paste the boxes from one slide to another, as this shows Morph that they’re linked, and try to place the boxes in the same position on every slide, with the exception of the one that needs to move on the slide itself.
Once you’ve painstakingly placed all your elements, you can follow the instructions from the first method to hyperlink your markers and back buttons in exactly the same way. And you should end up with something like this:
There’s just one more thing to consider when working with Morph. If you choose to change the marker colours to highlight the locations, Morph might get a little mixed up and not get all the transitions right. To prevent this, assign a number to each location marker by typing directly into the marker shape, like this:

Don’t worry if this isn’t part of your design, we’re going to hide it, so it’s just our little secret. Right click on each marker and click Format Shape. In the side panel, click into Text Options and change the text Transparency to 100% and voilà, they’ve disappeared. Now your markers should stay put when you navigate between location slides.
Make PowerPoint more interactive with a map like this. Learn how to use hyperlinks and hidden slides. This is the key to unlocking another level of PowerPoint. Once you’ve got your head around it, you can start to fake multiple web-style features without having to leave PowerPoint or spend piles of cash working with a web developer. The possibilities are endless, from suggested further reading options that animate in when triggered, additional information pop ups, and hidden menus that appear on click to take you to anywhere within your presentation, your audience won’t have seen anything like this in PowerPoint.

