
Create presentations twice as fast with these time-saving PowerPoint tips picked out by our PowerPoint developers.
Time is precious. Time is money. OK, I’ll stop; no more terrible clichés. Time is of the essence after all.
In our day-to-day lives, we all look for little ways in which we can save a little time . A personal favourite of mine is brushing my teeth whilst in the shower, saving me a whole three minutes in the morning. Anyway, I digress. Enough with my morning routine – let’s get on with the crux of this post.
Below you’ll find five of our favourite time-saving tips that we use every day when crafting presentations in PowerPoint. If you’re a regular PowerPoint user, then bookmark this page until these quick tips are ingrained in your brain. In no time at all, you’ll be busting out presentations faster than you can say ‘capricious’ (it’s our word of the day in the office or at least it was a month ago when I started writing this).

CAPRICIOUS | KƏˈPRɪƩƏS ADJ: GOVERNED OR CHARACTERISED BY SUDDEN, IMPULSIVE, AND SEEMINGLY UNMOTIVATED IDEAS OR ACTIONS: UNPREDICTABLE.
THE CAPRICIOUS WINDS AND WEATHER DELAYED THE SAILORS’ RETURN.
Please note that these time-saving tips apply to PowerPoint 2016 on PC.
Find and replace text
This one is so simple, but one we can often forget about if we’re not using PowerPoint regularly. Say, for example, you needed to change all instances of a word or phrase in your presentation.
On the Home tab, in the Editing group, choose Replace.

In the Find what box, enter your text e.g. buffalo7.
Then in the Replace with box, enter the text you want to use as the replacement e.g. Buffalo 7.
Then select Replace all and PowerPoint will tell you how many times it has replaced this word or phrase.
Animation Painter
Animation plays a huge part in bringing your slides to life. However, it’s important that your animations have a consistent feel throughout your presentation.
When animating different elements on a slide you will, more often than not, want them all to do the same thing. Animating them all individually can be very time consuming, but with the Animation Painter, you can essentially copy and paste animations to any element instantly.
Apply the animation you want to use to one of the elements on your slide. For advice on choosing PowerPoint animations check out this previous post.
Select the object with the animations that you want to copy.
On the Animations tab, in the Advanced Animation group, click Animation Painter.

On the slide, click the object to which you want to copy the animations.
Additional tip: double click the animation painter button and you’ll be able to select as many objects as you like and simply re-click on the button when you’re finished.
Duplicating slides and objects
Now unless this is the first time you’ve ever opened up Microsoft Office, you’re probably already aware about Copy and Paste (CTRL + C then CTRL + V). This works in exactly the same way in PowerPoint.
A lesser-known shortcut is Duplicate.
Say you have finished a slide and want to make another similar slide. It’s quicker to duplicate the slide than to start from scratch.
Click on the slide in question in the side column (left) and press CTRL + D.
Or you’re creating multiple instances of the same object on a slide that all need to be the same distance apart.
Select the object and press CTRL + D.
Move the new object to where it needs to be.
Press CTRL + D again to create a third instance of the object.
The distance between object 2 and 3 will automatically be exactly the same as the distance between object 1 and 2
Got it? When you’re building lots and lots of complicated slides, this one saves so much time.
Smart guides
We’ve talked about consistency throughout your PowerPoint deck a million times before (I’m exaggerating again, but it’s a lot) but it’s so important if you want a coherent slide deck.
Content should be lined up correctly across all your slides.
Smart guides will track spacing between objects, so you can keep distances between objects the same throughout your presentation.
On the View tab, click Show, then under Guide settings, ensure ‘Display smart guides when shapes are aligned’ is ticked.

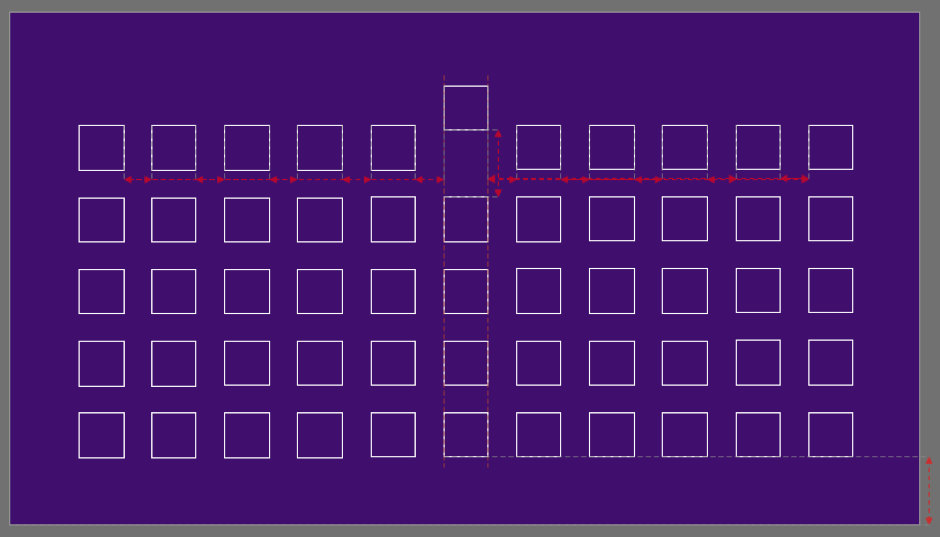
Distributing content evenly
Staying with the consistency theme, if you have multiple icons or images that you want to be distributed evenly on a slide, you can drag them manually to where they need to be, and smart guides will kick in helping you to ensure they are all equidistant.
However, there is a shortcut that can save you quite a bit of time, especially on slides with lots of icons or images.
Select all of the objects you want to be evenly distributed.
On the Format tab, in the Arrange group, under Align select Distribute Horizontally/Vertically.

The icons or images will now be distributed evenly between the first and last icon/image.
There’s plenty more shortcuts in PowerPoint that will speed up the design process when you’re creating your slide deck, but these five we use time and time again. Utilise these tips, and the twenty slide presentation you have to create by five o’ clock suddenly becomes much more doable.
In fact, you’ll probably get it done with time to spare, even if you’re feeling a bit capricious at the time.

