
Turn any jumble of slides into one seamless, beautiful presentation. This is how to merge PowerPoint presentations together in just a few simple steps.
Planning and running an event with multiple speakers requires lengthy checklists, a degree in plate spinning and a lot of caffeine. Between finding a venue that is easily accessible by public transport and within spitting distance of the nearest bar, executing an agenda that the Swiss would be envious of, and ensuring the guest list is more impressive than a royal wedding, you have little energy or time left to reformat and redesign everyone’s slides.
Getting your hands on all the presentations before the deadline is challenging enough and when you come to create your master file, you could do with merging them quickly and easily. So, why does PowerPoint have other ideas? What should be a simple copy and paste leads to previously beautiful slides looking like something even Mary Shelley couldn’t dream up.
Don’t panic: you just need to make a small adjustment, and you’ll be one step closer to perfectly merged PowerPoint presentations and a seamless event in no time at all.

How to merge PowerPoint presentations
- Start by opening the two (or more) presentations that you need to combine.
- In any one of the decks, select all the slides that you want to transfer across.
- Right click and select Copy.
- Moving across into the other presentation, right-click where the copied slides need to go and select Paste.
So far, this is exactly what you were doing anyway, right?
I’m not here to teach your grandmother how to suck eggs. Here’s the magic ingredient.
The Paste options icon.

It’s small, and it’s really easy to miss, but every time you paste an object in PowerPoint, it appears.
- Now all you need to do is select Keep Source Formatting from the options and voilà! Your slides will magically reformat and look like their old selves again.
- Repeat until you’ve combined all your presentations and all that is left to do is sit back, have a glass of wine and enjoy the event rather than nervously watching the slides.

Sizing up the problem
Hold that thought for just a moment. Are some of your slides still looking more stretched than Mr Fantastic after a hot yoga class?
Think back – did you tell the speakers to build their slides in 16:9 ratio? Uh oh.
Even though PowerPoint itself doesn’t recognise this technological evolution and still considers 4:3 to be ‘standard’, the only modern use for this archaic slide size is to present on iPad.
Do you want your speakers to present their slides to a concert hall by holding up an iPad? No? Your slides should probably be 16:9 then.
You can fix the problem, but it’s not going to be easy – unless you have a time machine?
If not, settle back down at your computer. You can still have that glass of wine though.
When PowerPoint scales 4:3 to 16:9, images become stretched to fit, while content remains stuck in the centre of the slide. All in all, not a good look.
The first thing to do is turn on your guides: right click on your slide and tick Guides.
Using the original 4:3 design as a reference, move the guides as to where titles, subtitles, footers, and any other repeated elements should sit on your (now larger) canvas. Now all there is to do is apply a little artistic flair and start rearranging everything.
I said it wasn’t going to be easy.
Anything that holds the same position throughout, such as company logos, can be copied and pasted for ease, but most elements will need to be reformatted manually.
If your speakers have used ‘Format Background’ to add background images, you will need to ask them to send over the original imagery, so that you can reinsert these to no longer look like a reflection in a funhouse mirror.
If this wasn’t the answer you were hoping for, the simple solution is to provide technical specifications to your speakers before they begin. Sorry.
Your slides are now looking good, but there are a few more things to consider to ensure there are no hiccups on the night.
Lighten up
Large PowerPoint files can end up running at a snail’s pace, and potentially even crash. When you’re merging multiple PowerPoint presentations into one file, the MBs can quickly add up. You don’t want to start dictating the type of content people can have in their presentations, but when they use full-length videos for just a short clip or high-resolution imagery but crop it down to a few centimetres, the presentation is still carrying all the weight of the original file.
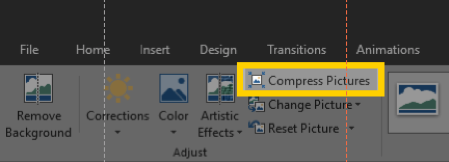
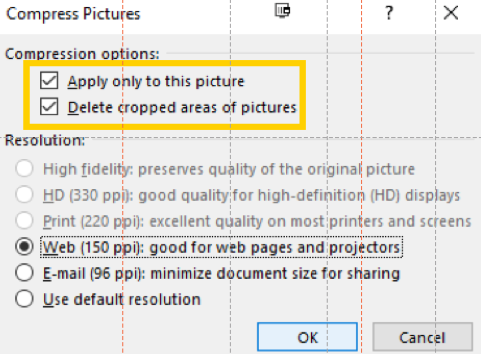
PowerPoint can trim all this excess for you. There is an easy-to-use compression tool within PowerPoint. You don’t have to pay or learn to use expert software such as Photoshop to achieve this. Simply select Compress Pictures and adjust your compression options based on your specific needs.
Setting the resolution at 150ppi will create the perfect look with none of the excess file size.
As if that wasn’t helpful enough, PowerPoint has another tool for compressing video, which can be found by clicking into File and then Info.
Under Media Size and Performance, select Compress Media.
As with imagery resolution, we find that compressing media to Internet Quality works perfectly for presentations.
If you want to know how to make your PowerPoint files even smaller, you can get more tips from our in-depth post on reducing file size.
If you’re still finding that your file is lagging, it might be time to take a coffee break.
Using scheduled intervals to break up the file, as well as the day, can be a seamless way to separate the presentation into smaller files without anyone noticing you’re making the switch.
If you’ve done everything above and PowerPoint is still crashing, try reading our nine helpful tips to combat this frustration.
Provide a framework
But what if you don’t want a hodgepodge presentation, jumbled with different brands, fonts and colours? After all, you planned this event. It was your late nights and lengthy email chains that went into its creation. Shouldn’t it be your branding on the slides?
Having a template created in advance can put the control back in your hands.

You could set the styling rules so that every slide strictly adheres to your branding, or you could create a loose framework where the speakers can be free to add their branded elements, but your mark is still on every slide.
Adding a placeholder for a composite logo can be an efficient method for creating cohesion between partnering brands, without adding extra work.
By providing all your speakers with a template, you can ensure consistency across all the presentations – no titles jumping around from slide to slide or fonts mysteriously getting bigger as you progress through.
You will also be able to rest easy knowing the template has been built at the correct slide size for the screen, the default text size is big enough to read from the back of the room and you won’t have to merge PowerPoint presentations together at the end.
And if they do manage to get a little ‘creative’ with their formatting?
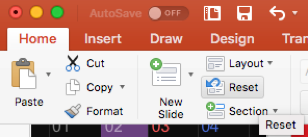
A quick reset of the slides will put them all perfectly back in place.
As with any aspect of event planning, the smoothest presentations require a little advanced preparation. By adding these few items to your checklist, you’ll reduce last-minute panics and swiftly end up with a full set of slides that look great and run to perfection.

