
What good is a presentation if your audience never gets to see it? Glitches, stuttering animations and file crashes can all be avoided. Don’t let all your hard work go to waste, compress your images in PowerPoint, reduce your PowerPoint file size and deliver a slick and seamless presentation.
Using photography and video in your PowerPoint presentation is a quick way to make your slides visually appealing. You can play with layers, communicate with more than words, introduce movement, and add a designed feel to your slides, without spending weeks learning complicated design theory.
What’s more, audiences are more likely to understand and remember your key messages, if the spoken word is supported by on-screen text and a relevant image. It’s a triple threat.
However, most people focus solely on finding the perfect image that says exactly what they need it to. Perhaps you recognise the pre-presentation routine: you spend hours scrolling through stock image libraries, such as Shutterstock and Unsplash, and when you finally find it, you’re so elated and relieved that you just whack it in your presentation and consider the task accomplished.
Fast forward to presentation day
You stand up, in front of all those expectant eyes, feeling as though you’ve learned the topic inside out, you’ve done a quick Wonder Woman pose in the bathroom, to get your confidence up, and you’ve mastered your breathing. You’ve got this.

Then, you click to start the presentation. Small animation stutter, but no drama. Breathe deep and press on. Uh oh, the video won’t play smoothly, it’s just jumping around and making no sense to anyone. Smile. Roll your eyes in an exaggerated fashion. “PowerPoint, eh?” They laugh, you’ve got them onside. Remember, minor public speaking fumbles make you more likeable to an audience.
Complete freeze. The Wheel of Death appears, and you know it’s over. What’s more, your audience knows it’s over too.
While PowerPoint may serve as a useful scapegoat at times, most glitches and freezes come down to human error. Large files, caused by careless use of imagery, is the most common culprit. In just a few steps, you can compress images in PowerPoint, reduce your PowerPoint file size and prepare for a presentation free of interruptions.
Eliminate the need to compress images
“Treat the cause, not the effect.”
“Prevention is better than cure.”
“If you don’t bloat your presentation in the first place, you won’t need to compress images in PowerPoint at all.”
We’ve all heard these common phrases. Well, the first two at least.
Bigger isn’t always better. Ok, I’m going to stop talking in riddles now. But seriously, you don’t need to throw huge images into your presentation for them to show on the screen, as beautiful and crisp as you always dreamed they’d be.
Even if you’re going full screen with your imagery, you only need 1920×1080 pixels, which should equate to no bigger than 500kb per image.
And, if your image is only taking up a quarter of the slide, you only need a quarter of the pixels and a quarter of the file size.
The best file type for working with images in PowerPoint
For the purpose of this post, we’re focusing on the biggest imagery issue: photography. Vector images tend to be a lot smaller in file size and cause fewer issues. You can read all about vector images here.
When working with photography, we recommend using JPEGs, where possible. These tend to have the lowest resolution. That may sound bad, but remember, it’s all relative. You don’t need super high res photography for most modern screens. Your images will still look incredible.
However, if you need to utilise transparent backgrounds, you’ll have to use PNGs for those images.
Quick image fix, before considering compressing images in PowerPoint
If you’ve used other file types in your presentation, because that’s all that was available to you, you can save them out as JPEGs without having to use any other fancy software.
Simply right-click the image, Save as Picture and select JPEG as the file type. Then swap your old images for the new, and resave your presentation. You’ll reduce your PowerPoint file size instantly.
Compress images in PowerPoint
You’ve chosen the perfect images, in the perfect file type, and at a reasonable size, but your PowerPoint deck is still stuttering through animations and taking an age to save. The more slides and more images you use, the more likely this is to happen, no matter how good you are at keeping each individual image small in file size. It’s time to reduce your PowerPoint file size by utilising some clever tools within PowerPoint itself.
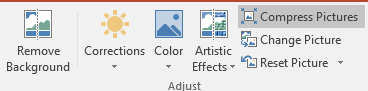
To compress images, without leaving your PowerPoint window, first select as many pictures within your presentation as you want to compress. You’ll see the Picture Format tab appear in the main PowerPoint ribbon. Select Compress Pictures under this tab.
A dialogue box will appear, with a number of options. If you want to compress the images throughout your presentation, deselect Apply only to this picture.
If you think you may need to edit the images later, deselect Delete cropped areas of pictures. This does further reduce file size, so if you’re sure your presentation is perfect, leave it ticked.
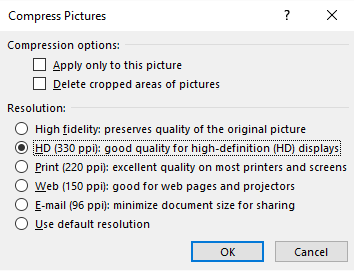
Finally, you’ll need to choose the resolution for your newly-compressed images. The lower the resolution, the smaller the file size, but the resolution you choose comes down to purpose. If you need to print your slides, stick with 330ppi, but if your deck is only destined to be presented, you can drop down to 150ppi. Anything higher is unnecessary.
Compress media files in PowerPoint
We haven’t reached the end of our story yet. There’s more to visuals than images. If your deck includes video, you can follow these steps to compress these, using PowerPoint’s built-in tool to make your build that little bit easier.
Before you do, bear this in mind: If you have embedded subtitles, or audio on your media file, then the compression will remove these, so you’ll have to skip this stage of your compression journey.
If you do want to compress all media, here’s how you do it:
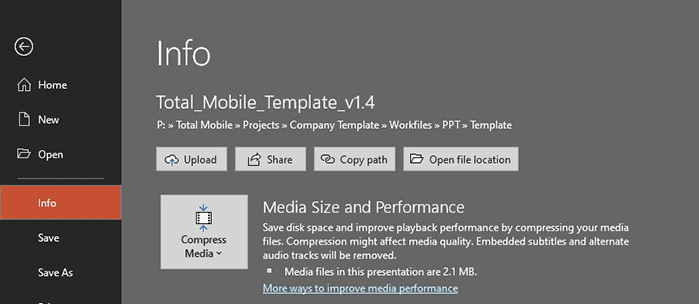
Under the File tab, click Info. Find your way to the Media Size and Performance section and click Compress Media.
Once again, you’ll be asked to choose your level of compression. The options are Presentation Quality, Internet Quality and Low Quality. Not to argue against PowerPoint here, but we’ve found Internet Quality to be more than good enough for presentations.
Not only will this built-in tool compress all the videos in your presentation, it will cut any trimmed sections of video too, which is super handy when you don’t have access to video editing software.
Compress images for PowerPoint by using third-party software
We’ve left this one to the end of the list, because more often than not, PowerPoint can do exactly what you need, without additional cost. However, if you’ve tried all the steps up until now, and your presentation file size is still too bulky, it’s time to break out the big guns.
Using NX PowerLite* from Neuxpower, you can very quickly and easily shrink your PowerPoint files. It’s £37 per user (cheaper per user the more you have) and it’s a one-off fee. Don’t take our word for it though, you can download a free trial for 14 days to test it out for yourself.
*no affiliate, we just like the tool!
Don’t let bloated files ruin your presentation
Just because a presentation runs smoothly on your PC at home, doesn’t mean it’s always going to be the case. By following these simple steps, and keeping an eye on your file size, you can mitigate the risk of your presentation tripping you up, when it matters most.